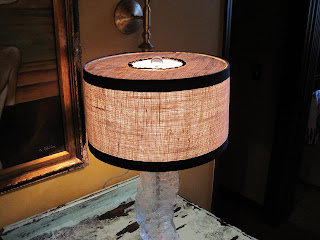
I have a new obsession, it's called the drum shade. So I have this super fabulous lamp. My parents bought it for my birthday. I thought it would look great on the distressed buffet that Brooks painted for me for my birthday.

The problem is, the modern style of the lamp didn't jive with the distressed look of the buffet. As a matter of fact, I couldn't get comfortable with making the buffet fit into the rest of the room either. So, I stretched my boundaries a little bit and sought some professional help. I saw a post by hugely talented photo stylist,
Annette Joseph. She was offering help to readers of her blog. She requested that you send in a photo of the troubled area and she would offer her suggestions. I totally took her up on her free PROFESSIONAL advice. Here is a
link to the blog post and her advice.
So, she said I needed a new lamp or lampshade. I couldn't agree more, but since I really loved the one I had I went out in search of a new shade. I looked in multiple stores, and everywhere I could think of on line. I couldn't find anything remotely close to what she suggested. So, I got the idea that I would cover the one I had. I found a couple of on line articles about the subject. I kind of merged their advice and came up with my own take on how to cover a lampshade. So here goes.
Step one. Enlist the help of someone way more artsy and crafty than yourself. I screw up every project I set out to complete and Brooks always has to rescue me. I got smart on this one and enlisted his help at the start.
Step two. Choose a light weight fabric that will let the light shine through. I chose a light weight loosely woven burlap type material.
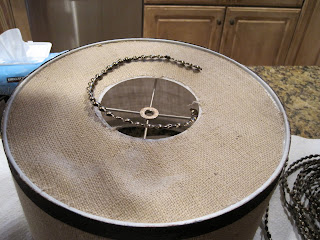
Step three. Oddly enough our lampshade had a top on it. Cut a piece of fabric to fit the top. Glue it with fabric glue.
Step four. Cut the fabric all in one continuous piece to fit around the shade. Use fabric glue and glue around the top and bottom rim. Roll and press fabric around the shade. Do not use hot glue for this because you will be able to see the beads when the light shines through.
Step five. Let the glue dry and then trim the top and bottom with grosgrain ribbon. Let dry.
Step six. Since our shade had the weird top I felt like it needed more trim. I found some upholstery strip tacks in the garage left over from a previous project.
I used hot glue on these since I didn't think fabric glue would hold. Here I am using a sophisticated piece of equipment to put a little pressure on the tacks to make sure they adhere to the lampshade.
That's it. Project complete. Next, Annette had recommended that I set up a tray of glasses and stuff to make it look like a bar. So, I had a few bottles of
Pellegrino that I put on a tray with a few wine glasses. I was pretty excited about how it turned out.

Thanks so much Annette for the great advice. I am thinking about having Brooks stencil something on the front of the lampshade like this:
What do you guys think? Too much? Overkill? I'd love to have some input.

 I was so pleased with the way our fabric covered lampshade turned out. I asked in my last post if I should have Brooks stencil on the front of the lamp. Everyone agreed that we needed to "go for it" and add a stenciled design. I was looking for an old Paris grain/feed sack style. I found this image on line and printed it out.
 He used a ballpoint pen to outline the image through the paper directly onto the lampshade.
 Then he took fabric paint and followed the lines he created.
  Then he painted the scroll work and the "flower market" free hand.
 This is how it looks on the buffet.
  I LOVE IT!!! It is exactly what I was going for. A whole new look for this lampshade was achieved for $16. Can't beat that with a stick. What do you think?


